Tuesday, January 11, 2022

Check Domain User Account

 I just learned this really helpful trick.  You can check the status of a domain account using: 

net user USERNAME /domain


https://www.webservertalk.com/check-password-expires-in-active-directory/#:~:text=Check%20User%20Password%20Expiration%20Date%20with%20Net%20User,command%20in%20the%20PowerShell%3A%20net%20user%20hitesh%20%2Fdomain

Thursday, November 19, 2020

Dynamics 365 Debug Custom Workflow Activity in a Real Time Workflow

 You CAN'T.

If you are having trouble following the steps to debug your custom workflow activity because the steps are not appearing, it's probably because you cannot attach to "Real Time" workflows.  If possible, make your workflow asynchronous (run in background) to debug your custom WF activity.

Tuesday, April 14, 2020

Email Templates for Custom Entities

I have used the trick of inserting the "magic" sequence of characters that allow you to insert custom entity fields into email templates, but there's an extra special trick if you insert a lookup field /@name.  Big thanks to Insight Dynamics blog post for the tip.  Here's an example for an entity called "Custom Entity":

{!new_customentity:ownerid/@name;}

Friday, March 6, 2020

UCI Email PartyList error - Entity type "queue" is invalid

I just ran into an error where some clever code check's the user's business unit and defaults the FROM addresss of an outgoing email to a particular Queue.  The code started throwing this error once we moved it to a Model-driven App.

It turns out the error was occurring because we had not included the Queue entity in our Model-driven App.  Once we added the Queue, the code worked just fine.

Friday, March 4, 2016

ComboBoxes in Dynamics CRM 2013

Have you tried the new ComboBox control in CRM 2013?  Wait...what did you just say?!?  Here, click on the screenshot and watch this:


Actually, I'm a little early for April Fools' Day, but I really did build a pair of ComboBoxes that are backed by two entities that have an N:N relationship.  With an added checkbox, you can override the filtering and display all the available records in the child.  The key to making it so performant was utilizing an external WebAPI caching application.  That makes it a snap to bind the jQuery Autocomplete to the JSON output.

If you need help with a ComboBox, or anything else in Dynamics CRM, don't hesitate to reach out.

Wednesday, October 14, 2015

Helpful links and information for CRM Developers

My collection of essential links and information for Dynamics CRM Developers

MSDN References
Linq query examples
MSDN Client-side programming reference
Developers guide to reports for CRM

Communities
MSDN CRM Forums

Tools
PowerShell Tools
MscrmTools / XrmToolBox

CRMSvcUtil XrmServiceContext example:
CrmSvcUtil.exe /codeCustomization:"Microsoft.Xrm.Client.CodeGeneration.CodeCustomization, Microsoft.Xrm.Client.CodeGeneration" /out:Xrm\Xrm.cs /url:https://myord.api.crm.dynamics.com/XRMServices/2011/Organization.svc /username:admin@myorg.onmicrosoft.com /password:pass@word1 /namespace:Xrm /serviceContextName:XrmServiceContext


Saturday, September 26, 2015

Setting up RAID 1 on M5A78L Windows 7

My current Win7 Media Center PC has been running 24x7 for 3 plus years and the cruft on the OS was starting to really slow things down.  I figured it was time to re-install, but this time I wanted redundancy, so I bought two WD 160 drives to setup a RAID 1.  Here's the trick to setting this up in the ASUS Bios:

  1. On the SATA Configuration tab, select Ports 1-4 and change their mode to RAID (note this also changed 5-6 to RAID, so I needed to switch that back to IDE for my optical).
  2. Save and Reboot.  Wait for the RAID Bios screen to appear and hit CTRL + F
  3. In the RAID configuration, select the LD config and select LD 1 on the next screen
  4. In the LD details page, use SPACE to change value of RAID to 1 and select your drives. 
  5. CTRL + Y saves changes and then reboot and you're done!

Wednesday, July 29, 2015

Getting CrmSvcUtil to generate the CrmOrganizationServiceContext

It had been awhile since I generated the Early-bound classes used by a command-line setup program (MSFT walkthrough).  I had forgotten about the crmsvcutil.exe parameter that generates the CrmOrganizationServiceContext:
/codeCustomization:"Microsoft.Xrm.Client.CodeGeneration.CodeCustomization, Microsoft.Xrm.Client.CodeGeneration"

After adding the Microsoft.Xrm.Client.CodeGeneration.dll and Microsoft.Xrm.Client.dll to the directory,  the App.config constructor was available again:
using (XrmServiceContext xrm = new XrmServiceContext("Xrm"))


Tuesday, June 9, 2015

Dynamics CRM Publish External Report

Dynamics CRM on-prem has the ability to publish reports "externally" so that non-CRM users can view them.  Corresponding reports are created by CRM in the "root" folder (tenant name_MSCRM)  By default though, the SSRS data connection (MSCRM_DataSource) in the folder is not configured during installation, so a required step is to login to SSRS Report Manager and setup the data source.  Note, you have to click Details View (upper right corner of menu) in order to see the data source.

Typically, you'll want to use a service account that has the least privileges necessary to query the data from CRM.  The connection string follows the format:

Data Source=sql server;Initial Catalog=tenant_MSCRM

If you use a service account, you may get an error when you Test Connection in SSRS Report Manager:
Log on failed. Ensure the user name and password are correct.

In that case, the error may be caused because the account does not have "Log on locally".  

To grant this permission, do the following:
1.      On the report server computer, in Administrative Tools, open Local Security Policy.
2.      Under Security Settings, expand Local Policies, and then click User Rights Assignment.
3.      In the details pane, right-click Allow log on locally and then right-click Properties.
4.      Click Add User or Group.
5.      Click Locations, specify a domain or other location that you want to search, and then click OK.
6.      Enter the Windows account for which you want to allow interactive login, and then click OK.

7.      In the Allow log on locally Properties dialog box, click OK.

Wednesday, February 11, 2015

Find All References to a Custom Workflow Activity in Dynamics CRM 2013

If you ever need to find all the workflows that have references to a custom workflow assembly, you can query the Xaml column on the Workflow entity.  Using OData is the fastest way:

HTTP://MyCrmServer/MyTenant/xrmservices/2011/organizationdata.svc/workflowset?$SELECT=NAME&$filter=substringof('MyCustomWorkflowActivityClassName',xaml)

If you are on-prem, then you can also do this via SQL:

SELECT DISTINCT wf.NAME 
FROM   workflow wf 
WHERE  xaml LIKE '%MyCustomWorkflowActivityClassName%' 

Tuesday, February 10, 2015

Stuck Dynamics CRM ImportJob importing a Solution

Did you know that you can view the progress of your import by using Advanced Find to query Import Jobs?  If you ever "lost touch" with the progress bar window, this can be very useful.  I have a saved view that displays the imports from the last 7 days in descending order.

Unfortunately, jobs can get stuck during import and prevent you from importing your solution again.  In that situation, you need to manually delete the stuck job.  Fortunately this is super easy with the Advanced Find you created above.  There is a special Delete button on this view.

You can also do it programmatically with the early-bound classes and a Linq query in the Service Context:

var xrm = new XrmServiceContext("Xrm");
var deadJobs = xrm.ImportJobSet.Where(x => x.CompletedOn.Equals(null));

foreach (var job in deadJobs)
{
    Console.WriteLine("Deleting Job Created On: " +job.CreatedOn);
    xrm.Delete(ImportJob.EntityLogicalName, job.Id);
    xrm.SaveChanges();
}

Monday, November 17, 2014

CRM 2013 Invalid Argument FetchXML Report Errors on Premise

I love it when my former-self comes to the rescue of my present self.  I have been wrestling with an SSRS error that I knew I had seen before.  In searching for an answer, I ran across this blog post I wrote a couple years back.  I'm going to copy it here, just in case my former employer decides to take it down:


Even though the Report Wizard has some inherent limitations, it is still a useful tool for end-users that want ad-hoc reporting, or if you want to see beyond the 10,000 record limit when exporting to Excel.  You may find however that reports created by the Report Wizard return an "Invalid Argument" error. 
This happened to me recently so I followed my usual debugging steps but that did not help because the browser didn't return an error.  I checked the CRM and SSRS event logs, but there wasn't any helpful information in the errors that were logged.  Next I checked the SSRS HTTP Log and found some interesting information.  Note, the default location for the log is:
\Microsoft SQL Server\\Reporting Services\LogFiles
In the log I saw that I was getting a security error:
System.ServiceModel.Security.SecurityNegotiationException: A call to SSPI failed
When I looked up this error, I ran across KB2590774 which described the exact issue I was facing...unfortunately it involved SPNs; probably my least favorite administrative topic.
The instructions are a little contradictory.  It says that all you need to do is setup an SPN for the CRMAppPool...unless you are running IIS in Kernel Mode (generally the recommended configuration).  If running Kernel mode, you are supposed to review the information in the article about SPNs and IIS 7 Kernel Mode.
I read and confirmed that for my configuration (Scenario 2b - Custom app-pool and host header)the recommendation was to register an SPN for my custom URL on the NetBios name (aka, the computer name).  Unfortunately this did not resolve my issue, even after adding "trust for delegation" in AD.  So I tried the KB's recommendation which was an SPN for NetBios name on the CRMAppPool account:
setspn -s HTTP/my_server_name my_domain\my_CRM_app_pool_identity
After that SPN was applied (always using -S to check for duplicates) the FetchXML reports instantly started working!

Friday, November 14, 2014

Easy way to enable DevErrors for Dynamics CRM using IIS Manager

Windows Access Control prevents you from directly editing the Web.Config file for IIS site, so rather than copy/paste, you can use IIS Manager to edit keys via GUI.  To turn the DevErrors key to On you need to change the Section selector to appSettings and click the “…” button in the (Collection) property.  Make sure you click the Apply button (Action menu on right) after making a change:

Wednesday, November 12, 2014

How to Hide Alerts in CRM 2013 Sitemap Menu


Alerts appeared in 2013 to display server-side synchronization.  The information in the alerts can get pretty technical so they may not be appropriate for end-users.  In order to hide them from the menu, you can remove read permissions on the Trace entity (under Core Records).

Tuesday, November 11, 2014

Tricks for working with SetState and SetStateDynamic plugins

There are a couple of tricks to working with SetState and SetState Dynamic plugins.  To get the State that the record is "becoming" you can check the InputParameter "State":

var state = (OptionSetValue) context.InputParameters["State"];
localContext.Trace("Contact State: " + state.Value);

if (state.Value == (int)ContactState.Inactive) return;

To get the Guid of the record, check the PrimaryEntityId property:

Guid targetId = context.PrimaryEntityId;

Monday, November 3, 2014

Using PowerShell Get-ADPrincipalGroupMembership to find a user's groups

I needed to find a good AD group to grant organization wide permissions to an SSRS report and found the Get-ADPrincipalGroupMembership was really useful for querying AD.  The server needs to have the "Active Directory modul for Window PowerShell" feature enabled to allow import-module activedirectory to work:

import-module activedirectory
Get-ADPrincipalGroupMembership [username without domain prefeix] | Get-ADGroup -Properties * | select name, description
Get-ADGroup [group name]

Thursday, August 28, 2014

Saving a CRM form with missing required fields

I ran across an interesting problem in that I needed to allow a CRM user to save the progress of a form that has required fields.  The required fields are not truly required until the user initiates a separate submission step.  I was able to "temporarily" remove the required from the fields and then put it back on after the save using this script:


function onSave() {
    var i = 0;
    Xrm.Page.ui.controls.forEach(function (control, index) {
        if (typeof control.getAttribute == 'function' && typeof control.getAttribute().getRequiredLevel == 'function' && control.getAttribute().getRequiredLevel() == "required") {
            reqControls[i] = control;
            control.getAttribute().setRequiredLevel("none");
            i++;
        }
    });
    Xrm.Page.data.save().then(onSaveComplete, onSaveFailed);
    
}

function onSaveComplete() {
    reqControls.forEach(function (control) {
        control.getAttribute().setRequiredLevel("required");
    });  
}

Tuesday, February 25, 2014

The lock value must exist error when resetting ADX auto-number

If you try to manually reset the "Last Number Used" field in ADXStudio's Productivity Pack, you will receive an error that says, "The lock value must exist."  This is actually a good thing, because it means the locking code is working properly.  Here are the steps for resetting the Last Number Used field:


  1. Enter "1" in Lock Value field and Save
  2. Enter "1" in Lock Verification field.  Now you can change Last Number Issued to any value you'd like (e.g. "1000") and Save
  3. Clear the Lock Value field (blank) and enter "1" in Lock Verification field and Save
You are all done!

Tuesday, December 17, 2013

Dynamics CRM 2013 Spreadsheet Import Tricks

This is part 2 demonstrating how to upload a spreadsheet of bounced emails addresses to modify contacts.  In part 1, we created an Email Bounce entity and a Real-Time Workflow.
The first step is to download the Import template.  This step is optional and depending on the scenario. may make it easier (or more difficult).  In this case, it’s going to make creating the map easier, so let’s get started.  Navigate to your entity and click the Import Data – Download Template for Import and save the XML file. 
Most of the time your computer will not realize this is an Excel file, so to open the XML file, start Excel and use File – Open.  Now you can paste your list of email address into BOTH columns.  Save your changes to a new file (so you can reuse the template next week) and exit Excel.
Start the Import dialog and select your XML file in the first screen.  CRM will recognize that you want to upload Email Bounce records, but we need to edit the mapping, so click Edit.
We need CRM to lookup our Contacts using the email address, but it doesn’t do that be default, so we have to add it to the Lookup reference.  Click on the little icon next to the Contact field and select the Email field from the list of Contact fields.
Click Next until you get to the Finish screen.  Tip: give this Mapping a name, so you can reuse it next time.  Click on the “Imports” link to watch the process unfold. 
If you have any errors then you can export the failed rows and manually process them.
Remember that Mapping we saved, well reusing it is not as easy as you’d think…when uploading XML files, there’s a strange trick to it.  You still have to click the Edit button after uploading the XML file, but when you get to the Map Record Types dialog, click Back and you are magically transported to the Select Data Map dialog. 


After that, you just click Next, Next, Next…as quick as you can and you’re finished.

Dynamics CRM 2013 – Handle Bounced Emails


If you have a lists of email addresses that returned as bounced, how can you update your Dynamics CRM contacts?  Easy!  Create a new entity and put the power of Dynamics Workflows to use.
The first thing we’re going to need is a new Entity – let’s call it “Email Bounce”.  Let’s keep this entity super-simple and turn off all of the Communication and Collaboration options.


Before we hit Save, let’s change the Primary Field so we can use it to store a text version of the email address.  Rename it to Email and set the length to 200.

After you save your entity, open the Form and add a new Lookup field for Contact.  Save and Publish your entity.  Now on to the workflow.
Create a new Process - either in your Solution, or in the Processes subarea of the Settings menu.
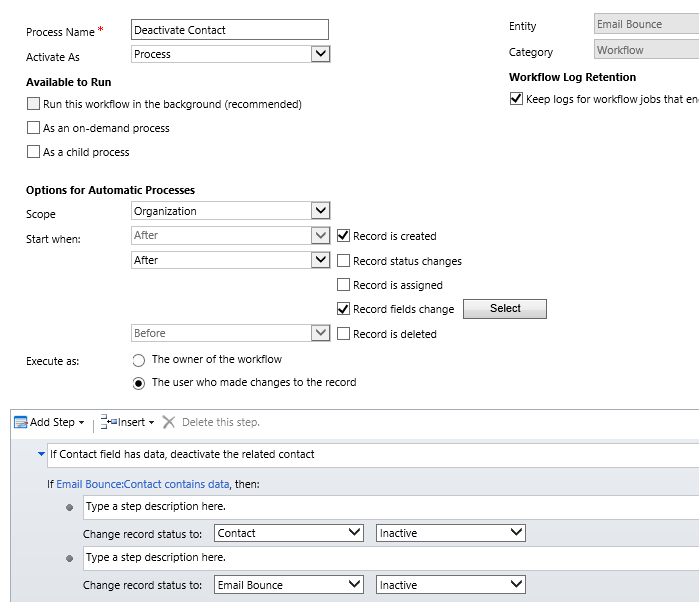
Now you have a decision to make…well, that is if you are using CRM 2013.  I chose to create a Real-Time Workflow because I am planning to Deactivate my Email Bounce records once a matching Contact is found.  I will be uploading these emails using a spreadsheet, and I know there will be times when my email address does not find an exact match.  If two contacts are found, or none, I’d like the Email Bounce record to “hang around” so we can manually investigate.  With a Real-Time Workflow, when the Contact Lookup is populated, the screen will refresh and my Email Bounce will be Inactive, signaling success.  If I used a regular workflow, the record would be inactive, but the user wouldn’t see it unless they manually refresh their view.  Score one for CRM 2013!  Here’s how I setup my workflow.  Note, mine runs on Create and Update (of the Contact field)

Now, if you’ve never used CRM’s Import features, you are in for a real treat!  Check out Part 2 –Data Import Tricks.