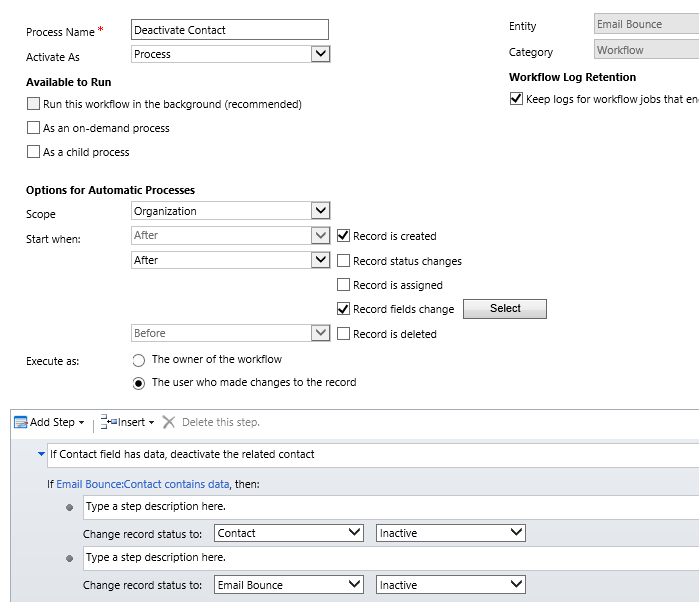
Synchronous Workflows
There are a bunch of great new features in CRM 2013. One particularly powerful one is synchronous workflows. It used to be that workflows could only run asynchronously, which made them an inappropriate choice for many automation scenarios. For example, if you needed to calculate a value that would be displayed to the user, workflows were a bad choice since they might take two seconds or 20 seconds, but either way, you were not going to see the results until the user refreshed the page sometime after the workflow completed.
If we turn our attention to another new feature in 2013, the Process Flow, we notice that the Lookups do not allow us to set any “filtering” like we can on the form. For example, it’s typical to setup a filter between an Account field and a Contact field. That way, you only have to search through a list of Contacts related to the selected Account.
Let’s create a handy Contact Abbreviation field to demonstrate synchronous workflows and make it easier to find a particular contact in the Opportunity Process field.

We’ll be using the
Manipulation Library written by Carlton Colter and available for
download on CodePlex. This will add a number of useful String and calculation steps to your workflow Add Step menu:

Add a field to the Contact to hold the Abbreviation (optionally add it to the Form)

Now let’s use the Manipulation Library’s Substring step to calculate the Account abbreviation. Follow these Steps:
- Before we get into the fun stuff, let’s make sure our Workflow does get confused. Add a “short-circuit” to only run if we actually have an Account to work with (remember, Company Name is of type Customer which could also be a Contact!):

Interesting discovery – if you stop the workflow with status of Cancelled it will throw and error back to the user.
- Now Click Add Step and find the “Strings Utilities” – you may need to scroll (note difference in spelling seems to be a bug in the library) and select Substring

- Give the step a good “variable sounding name” since we’ll be using this later in a formula. I called mine Account Abbreviation.
- Click Set Properties and then click in the Text value box. Then select Related Entities – Company Name (Account) in the right menu. Select Account Name and click Add. Lastly click OK.

Repeat this process for First Name and Last Name but change the Length to
1
Now that we have all of our abbreviations, we just need to update the Contact, so click
Add Step and
Update Record. Give the step a name (e.g. “Update Zip Finder”) and click
Set Properties
Now we need to add the result of the three substring steps above into our Contact’s field. Unless you added the new field to the Contact form, you will need to scroll down and find it among the field “Additional Fields” section:

Now for the fiddly part. Select the Zip Finder field and then in the Look For, select
Account Abbreviaion – Result and click the
Add/OK like above. To add the other characters you will need to click in the Zip Finder field again, AFTER the highlighted slug and remove the extra whitespace. Now repeat the step for First and Last name. Your formula should look like this:

Now just click
Activate and again in the confirmation dialog:

Let’s give this a try. Update a few contacts so you have some Zip Finders to test with. I added a contact named Johnathan Smith to Blue Yonder Airline. Hey, when I search for “blu” I don’t see anything! That’s because we need to add our new field to the entity’s Quick Find View. The super-fast way to edit the system views is to return to the Contacts list and click the ellipses in the ribbon (…) and System Views:

Just click the Add Find Columns in the right menu and select your new column. Make sure you click Publish on the Contact entity (or Publish All Customizations) to make the change effective.

Now when you type “Blu” you get a list of all contacts that have a “Blu” anywhere in their name, company, email, etc.

In many systems that will return too many records to find the one we want. But, if I type “blujs” (or even “bluj”) I’m searching for a very distinctive string and will work in other locations like Lookups!

Now this abbreviation scheme may not work in every situation, but the algorithm is very tweak-able for your particular application.
Synchronous Workflows vs. Plugins
There will definitely be debate about when to use a synchronous workflow over a plugin so here are some guidelines about when to choose real-time workflows:
- Logic is relatively simple (if-then-else)
- The business rules may change frequently
- The data needed is contained in the primary entity or entities with N:1 relationships
- The process needs to create or send a template-based email